Thursday, March 29, 2012

Painted High Chair

After seeing several high chairs painted blue on pinterest, I really wanted one for Jack.  After looking for a couple of months I finally got lucky. Shannon, a friend and neighbor, had one in her Mother's attic. She was happy to let us use it, and didn't even mind the blue paint we wanted to use! A big thanks to Shannon. It will go back to her someday, but for now it's gonna be a great little addition to our kitchen. After the party of course.

Here a cute pic of Shannon and her husband Heith.


My friend and neighbor Shannon.

Shannon was a huge help to us when we were planning Jessie's wedding a few years ago. In fact, we could not have pulled it off without her! At that time Heith was in Iraq, so we decided to keep her really busy!

Back to the High Chair. Here are a few pics, still lacking a few finishing touches, but I think you'll like it!


After a little sanding from Ariel and AJ, I spayed a light coat of primer.Then I applied several light coats of spray paint I picked up at WalMart. The first paint I used was called Peacock Blue, but it had a little lilac going on. Ended up using this aqua color instead. I think Aqua Ocean Mist.

This turned out so cute, think I'll paint an old children's rocker we have. Keeping my eye out for more vintage high chairs! Love the painted look!


Tuesday, March 27, 2012

First Birthday Photo Shoot

Jack is having a 3 "parter" birthday. It goes something like this:

Part One-
1st Birthday photo shoot was a couple of weeks ago. A friend of Jessie's is a part time photographer so we went to her house, even taking along a birthday cake.  (Does the cake really count as your first birthday cake when it was used only for photo's? Hmmmm...let me think on that one.

Part Two-
This was the real birthday. Last evening Jason's parents, my sister and the rest of us at the Hutsell house, went out to eat, ate some birthday cake, (for real this time)...and then took Jack to play at the Park.
And believe it or not, the little fellow even  blew out his birthday candle! Over and over! Such a cutie.

Part Three-
The Party. Yes, THE party will be Saturday at the Regional Park with more friends and family. We've made most ot the stuff for the big day, well in the process anyway.

Here are a few Part One photos. It's gonna take a few more blog posts to update you on all this partying!

The Cake Banner Tutorial is Here


Isn't that the cutest face ever!


Monday, March 26, 2012

Happy Birthday To You {NKOTB}

Yesterday was Greg's birthday and last night, while all was quiet in the house...this song came blaring from Tanner's room.  Such a sweet thing to do :)

Tanner has a clever sense of humor!

Thursday, March 22, 2012

Cupcake Toppers

Cupcake Toppers are trendy at the moment. Jessie ordered hers from " Cupcake Express" on etsy.  Quick easy way to get what you need at a minimal cost...so we thought.

You see, we never considered the cost of printing these little cuties or even how we'd cut them! Tried scissors, NO WAY! Tried my circle cutter, like I used here, another NO WAY. I ended up going to Hobby Lobby with my 1/2 price coupon and buying a scalloped paper punch. 

But, that OK cause it's a handy dandy little gadget and I'm sure we will get lots of use out of it. 


Printed 12 per sheet from etsy.


I found it was easier to cut into strips like this,
then punch.  Be sure to center it as best you can!
Be sure to "center" before you "punch"!

Jack and Tanner giving me a helping hand.


Sunday, March 18, 2012

Sneak Peak

This weekend we really went to work getting things ready for the big par-tay!
Yes, the big ONE for Jack! So hard to believe he will be a year old in just a week! 

Water Labels from "Cupcake Express" on Etsy.
We were lucky to have someone who could laminate them with "peel and stick".
So easy, best way to add labels to your bottles.


Cupcake Toppers, a project for next weekend!

Jessie cutting some labels!

Liz gave us a helping hand and told us
about her recent trip to San Francisco!
Liz was very e x c i t e d !


Globes from Jessie's wedding in 2006!
Sure glad I saved these!

Got this idea from Pinterest!

Ribbon from Wal Mart, and past projects.

Now on to the Birthday Hat.
Made  pattern from brown craft paper.
 I just worked with it til I finally got it right.

Our friend April, will be add a monogram to the orange checked fabric,
which later, will be part of the hat. Hard to visualize now, but you'll see later!
Made a little yarn pom-pom for the top.
If you tie a string to it, then...

...you can pull the string down thru the center of the hat...
.
Check back later! 

Wednesday, March 14, 2012

Melissa and Doug

I am a fan of Melissa and Doug toys. Everything I've purchased has been top-notch!
I have found their products at TJ Maxx, and our "junk" store in Etowah, Tn (The one with all the baby items and Target returns!)

The latest find was at Goodies, couldn't turn down these darling "puppy dogs" for Jack. Since we don't have a real one at our house I thought these were a good substitute!

Don't you just love this little beagle pup! He is so well behaved!

The Jack Russell of course is a different story! Always jumping on everyone!

Roxie wasn't so sure about her new neighbor!

Yeah! They finally became friends!

Tuesday, March 13, 2012

First Taste of Summer!

I think Jack had his very first taste of Summer this afternoon! He loves it outside and I have a feeling I'd better get out my runnin' shoes!

Jack loves his Tikes Buggy!

He also loves "Roxie" our neighbor's dog.

Just noticed those bubbles :)

Sweetest face ever...

Come over here Roxie!

Great little playset Dr. Cortney gave us!

Learning to climb with just a little help from Granna!


Lots of new things to explore outside today!

He loves playing the Kazoo!

He knows how to hold it, but he's trying something new this time!

Saturday, March 10, 2012

Letting Go of the Ugly Boob Light

Once upon a time there was an ugly boob light. You know the kind that you see in lots and lots of homes.....It was very bland and boring. It gave no definition to the dining area. Just kind of hung there and provided a wee bit of light. Then one day this lady came. She began to paint and move furniture and make plans to replace the ugly boob light with something different.


Now, don't get me wrong. There is a special place for boob lights....in hallways, closets, and other indiscreet areas that needn't have a special look or personality.

So here it is, in all it's beauty, just waiting to be replaced. Now the magic question is: What shall the lady replace you with that doesn't have to be hard wired (requiring an electrician) and costs little or nothing. Aha!......


The solution is found at the local Ikea store. A beautiful black drum shade! Just what she was looking for! Now for a look at the price tag......

EEEEKKKK!! $40--FOR ONE SHADE!!!

Well, since she is working on a strict budget, she decided to move on and find another option. She looked in the bargain clearance room in Ikea at the end of her shopping and guess what she found!! TA DA--the same black drum shade with a light kit attached for $10--Now that's what I'm talking about!! She didn't need the light kit of course, but hey, it's only $10 and she will find another use for it. Now to figure out how to hang this thing!


After hours and hours of brain storming, mind mashing, and wondering what on earth she could use to hang up this hugemongous drum shade, she decided to simply get up there and take a look at it.

"Well for goodness sake! All I have to do is unscrew the finial, remove the glass dome, slide on the drum shade and reattach the finial," she exclaimed! It works, it works!! There's only a small gap at the top where the original brass shows, but not enough to cause me panic. She did have a bit of a problem with the light being exposed underneath, and she would still like to find a way to cover it so you don't see the exposed bulbs, but for now she is happy with it.

And the great part is... when it's time to move again, they take down the beautiful black drum shade, replace the glass dome, and they take the shade to the next place that will probably have another boob light!


And the handsome musician can play his stress away underneath the new drum shade in the ultra hip dining room. While the ladies look for more ways to make the house a home. And they all lived happily ever after. THE END! ....or is it?


Friday, March 9, 2012

Cake Bunting!

With Jack's birthday less than a month away, it's time to get busy! Jessie is taking him tomorrow for 1st birthday photo's and we are just a little behind on getting things ready. Thankfully, Debbie Jo came by to lend a very crafty helping hand. 

Here is a pic of Debbie and her beautiful daughter Laura!

Laura's bridal shower a couple of years ago! Pretty ladies!
Back to the bunting...
It was pretty easy but took longer to make than I thought! I'll show you basically how we did it...
 and if we can do it, so can you!

We used the following items:
Scrapbook Paper
White String
Glue Stick
Small Dowel

I had a dowel on hand, so I just broke off the ends, each one about 10 inches.
We also used string I had in my craft closet. Anything would do.

                                We cut a 3 1/2 inch strip of scrapbook paper.


The brown paper is the flag template.
I just worked with it until it was the size we needed, about an inch in width.

Fold your 3 1/2 inch strip of scrapbook paper in half.
Place your folded flag template on top of it.
Slip the folded template flag over the folded scrapbook paper.
I found this was an easy and fast way to make sure each flag was the same size.


Only 2 cuts needed here.

The bunting flags.
I am not even sure if that's what you call them!


Glue underneath your folded flag.

Slip the flags over the string and press, the glue will hold it really well... and it's that easy!
String'em up Debbie!

We found they looked much better if you creased the edge, close to the string.

Jack really didn't care about the projects going on.
But he did notice the two purses in the window!


Gonna be so cute!

The cake bunting- all finished, thanks to Debbie!
It's gonna be really great on the cake!

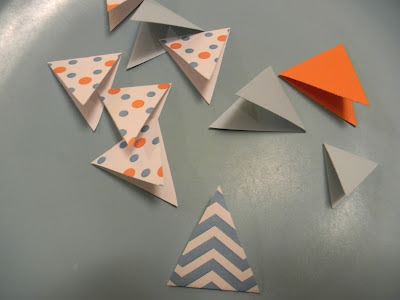
Leftover flags, who could bear to throw them away!
We only used 7 flags for a 6 inch topper cake.


Above photo from Pinterest and the inspiration for Jack's cake.
Great party ideas-check out her blog here